Note:
- In Any module, the first step is Select Instance (Project).
- The Manage Client module is used to maintain client data and create "Manage Instance" records. To add an instance, select the desired client and provide the required instance details.
The "Manage Clients" module provides an interface to manage all client-related information, including active clients and their details.
Key features include:
- Active Clients with Running Instances
- This section displays clients currently operating with active instances.
- Use this for quick access to ongoing projects or services.
- Client List with Quick Search
- This section lists all registered clients in the system.
- Each client tile displays:
- Client Name
- Short Name or Abbreviation
- Action Button: Clicking the arrow (→) on a client tile navigates to detailed information or further options for that client.
- Sorting and Pagination
- Sort By Name: Click the dropdown next to the Sort by Name button to sort clients alphabetically.
- Toggle ascending (A-Z) or descending (Z-A) order.
- At the bottom of the page, view the total number of clients and navigate between pages.
- Add New Client
- To add a new client, click the "+ New Client" button located at the bottom-right corner of the page.You will be redirected to the "Add New Client" form to input client details.
Let's begin the process to "Add the New Client", by using the below steps:
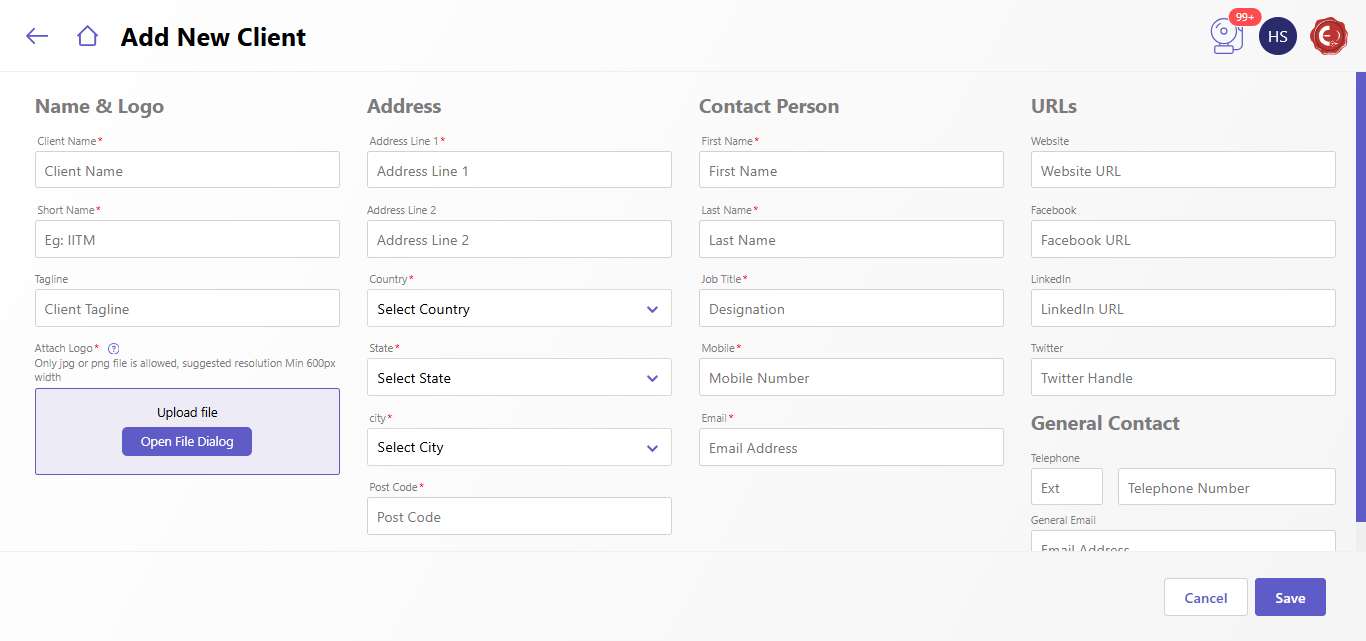
The "Add New Client" form allows you to input client details, including their address, contact person, URLs, and general contact information. It is divided into sections for organized data entry:
- Name & Logo
- This section captures the client's branding details.
- Client Name: Enter the full name of the client (required).
- Short Name: Provide an abbreviation or short name for the client.
- Tagline: Add the client’s tagline or slogan (optional).
- Attach Logo:
- Click Upload File to add the client’s logo (only JPG/PNG files allowed).
- Recommended resolution: minimum 600px width.
- Address
- Address Line 1: Enter the primary address details.
- Address Line 2: Enter secondary address information, if applicable.
- Country: Select the client's country from the dropdown menu.
- State: Choose the state or province.
- City: Select the city.
- Post Code: Enter the postal code
- Contact Person
- First Name: Provide the contact’s first name (required).
- Enter the contact’s last name (required).
- Specify the contact's designation or role.
- Mobile: Add the contact's mobile number (required).
- Email: Enter the contact person’s email address (required).
- URLs
- Website: Enter the client’s official website URL.
- Facebook: Provide the client’s Facebook page URL.
- LinkedIn: Add the LinkedIn profile link.
- Twitter: Input the client’s Twitter handle.
- General Contact
- Telephone: Enter the client’s main phone number.
- Extension (Ext): Specify the extension number, if applicable.
- General Email: Provide the general email address for client communication.
Created with the Personal Edition of HelpNDoc: Easily convert your WinHelp HLP help files to CHM with HelpNDoc's step-by-step guide