Candidate Application List
Note:
- In Any module, the first step is Select Instance (Project).
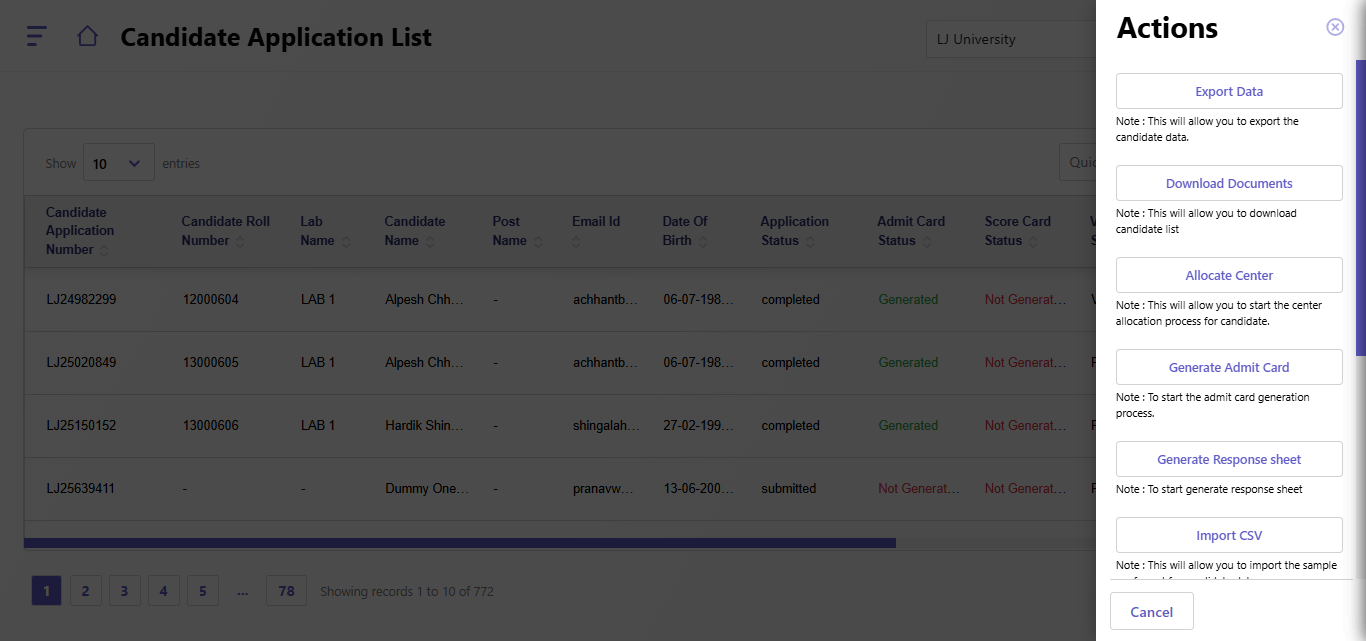
- The Candidate Application List allows administrators to view and manage candidate information. This includes key details such as application status, payment status, admit card generation, and more. The right-side "Actions" panel provides options to perform various tasks.
Candidate List Details:
- Columns:
- Candidate Application Number: Unique ID assigned to each application.
- Candidate Roll Number: Exam roll number for the candidate.
- Lab Name: Assigned lab for the candidate.
- Candidate Name: Full name of the candidate.
- Post Name: Job post or designation for which the candidate applied.
- Email ID: Registered email address of the candidate.
- Date of Birth: Candidate’s date of birth.
- Application Status: Current application status (e.g., completed, pending, draft).
- Admit Card Status: Indicates if the admit card has been generated.
- Score Card Status: Indicates if the scorecard has been generated.
- Verification Status: Status of document or application verification.
- Payment Status: Indicates if the payment was successful, pending, or failed.
- Pagination:
- Navigate through the list of candidates using the pagination controls at the bottom.
- Quick Search:
- A search bar is provided to quickly find a candidate by name, application number, or other details.
Actions Panel
The Actions panel on the right provides administrators with the following options:
- Export Data:
- Export the candidate list data to an external file format (e.g., CSV, Excel).
- Download Documents:
- Download all documents submitted by the candidate(s) for verification purposes.
- Allocate Center:
- Assign a specific center to a candidate.
- Steps:
- Click Allocate Center.
- Select the center, city, and shift.
- Save the allocation.
- Generate Admit Card:
- Start the admit card generation process for the selected candidates.
- Generate Response Sheet:
- Initiate the response sheet generation for candidates.
- Import CSV:
- Upload a CSV file containing candidate data.
- Includes importing sample formats to ensure data consistency.
- Import Center Allocation CSV:
- Upload a CSV file for allocating centers to multiple candidates simultaneously.
- Generate Result:
- Start the result generation process for selected candidates.
- Generate Score Card:
- Generate the scorecards for candidates after result declaration.
- Generate Exam Score:
- Initiate the process to calculate and generate exam scores for candidates.
- Download Admit Card/Score Card:
- Provides the option to download admit cards or scorecards for individual candidates.
Created with the Personal Edition of HelpNDoc: HelpNDoc's Project Analyzer: Incredible documentation assistant